Showing posts with label cocoa powder. Show all posts

Wednesday, April 2, 2014

Chocolate Zucchini Bread


It is no secret that cakes and breads are not exactly "healthy." This is a problem because I love to bake and I especially love to eat what I bake! This chocolate zucchini bread is great because it is fluffy, moist, chocolaty, AND relatively healthy! There is absolutely no flour or sugar in this recipe but you would never know it by tasting the bread! I think it actually tastes more like a chocolate cake than a bread!

To make this chocolate zucchini bread you will need:
  • 1 cup ALMOND BUTTER
  • 3 Tbs HONEY
  • 2 Tbs COCOA POWDER
  • 2 LARGE EGGS
  • 1/8 tsp SALT
  • 1 Tbs VANILLA
  • 1 tsp APPLE CIDER VINEGAR
  • 1/2 tsp BAKING SODA
  • 1 cup ZUCCHINI, shredded (squeeze as much of the excess water out as possible)
  • Optional: 1/3 cup NUTS (I used pecans)

Start off by preheating your oven to 400 degrees F. Then put the almond butter, honey, cocoa powder, eggs, salt, and vanilla into a medium bowl. Use a handheld mixer to blend on a medium speed for 2 minutes.

Add the vinegar and baking soda to the mixture and blend for another 30 seconds.


Next, fold in the zucchini and the nuts with a spatula.


It won't exactly look pretty... but I promise it tastes good!


Pour the batter into a loaf pan that has been lined with parchment paper and sprayed with cooking spray.


Bake the bread for 25-35 minutes depending on how much water you were able to get out of the zucchini.

Note: I would recommend checking the bread with a toothpick every few minutes after the first 25 minutes until it comes out clean.


You can serve it warm or at room temperature!


I cut my bread into pieces that were 3/4 to 1 inch thick which gave me about 10 slices.


Chocolate Zucchini Bread

Ingredients:
  • 1 cup ALMOND BUTTER
  • 3 Tbs HONEY
  • 2 Tbs COCOA POWDER
  • LARGE EGGS
  • 1/8 tsp SALT
  • 1 Tbs VANILLA
  • 1 tsp APPLE CIDER VINEGAR
  • 1/2 tsp BAKING SODA
  • 1 cup ZUCCHINI, shredded (squeeze as much of the excess water out as possible)
  • Optional: 1/3 cup NUTS (I used pecans)
    Directions:
    1. Preheat your oven to 400 degrees F
    2. Put the almond butter, honey, cocoa powder, eggs, salt, and vanilla into a medium bowl. Use a handheld mixer to blend on a medium speed for 2 minutes.
    3. Add the vinegar and baking soda to the mixture and blend for another 30 seconds.
    4. Next, fold in the zucchini and the nuts with a spatula.
    5. Pour the batter into a loaf pan that has been lined with parchment paper and sprayed with cooking spray
    6. Bake the bread for 25-35 minutes depending on how much water you were able to get out of the zucchini. Note: I would recommend checking the bread with a toothpick every few minutes after the first 25 minutes until it comes out clean.


      I adapted this recipe from the following blog: http://wholelifestylenutrition.com/recipes/organic-chocolate-zucchini-bread-recipe/

      Sunday, November 10, 2013

      Tiramisu Cupcakes


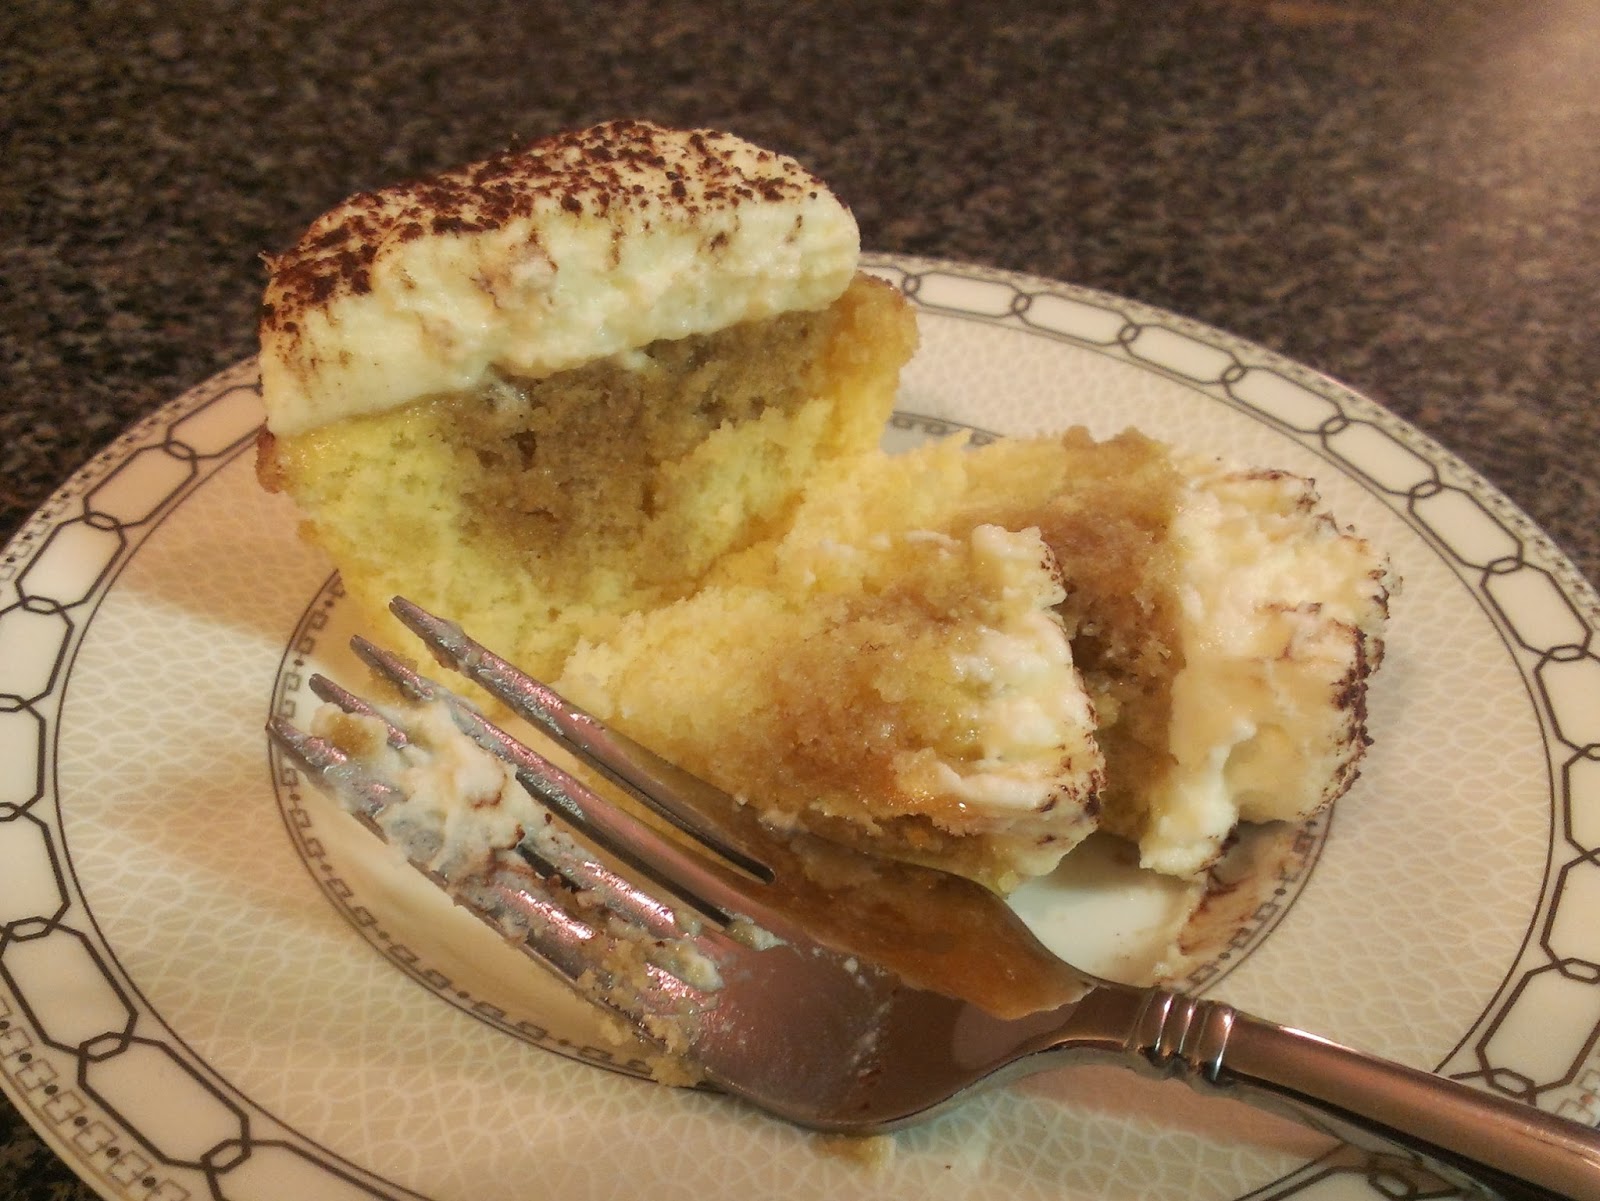
      If you like tiramisu and you like cupcakes then you will definitely LOVE these tiramisu cupcakes! The cakes are vanilla and are brushed with a coffee liquor syrup and topped with a delicious mascarpone frosting! This recipe will make about 18 cupcakes. 

      Tip: Be sure to make these cupcakes on the day you plan to serve them. You could make the components ahead of time, but don't assemble them until the day of! Due to the coffee syrup being brushed onto the cupcakes, they they start to taste a little soggy after a day or two. 

      Vanilla Cupcakes:
      • 1 & 1/4 cups CAKE FLOUR
      • 3/4 tsp BAKING POWDER
      • 1/2 tsp SALT
      • 1/4 cup MILK
      • 2 tsp VANILLA 
      • 2 Tbs BUTTER, unsalted
      • EGGS & 3 EGG YOLKS
      • 1 cups SUGAR
      Coffee Syrup:
      • 1/4 cup STRONG COFFEE
      • 1/4 cup KAHLUA
      • 1/4 cup SUGAR
      Mascarpone Frosting:
      • 1 cups HEAVY CREAM
      • 8 oz. MASCARPONE CHEESE
      • 1/4 cup POWDERED SUGAR
      • COCOA POWDER, for dusting 

      Preheat your oven to 325 degrees F. In a medium bowl sift together the 1 & 1/4 cups cake flour, 3/4 tsp baking powder, and 1/2 tsp salt, then set aside. 

      Put the 2 Tbs of butter in a small microwave safe bowl and microwave in 30 second intervals until the butter has melted. Then mix in the 1/4 cup milk and 2 tsp vanilla and set aside.

      Add the 3 eggs, 3 egg yolk, and 1 cup sugar to the bowl of an electric mixer and whisk until the contents have almost tripled in volume. The egg mixture should be thick enough that when drizzled over itself, it will stay on the surface for a few seconds.

      Before whisking:

      After whisking:

      Once the egg mixture has tripled, switch from the whisk attachment to the paddle attachment and mix in the dry mixture and milk mixture. 


      After all of the ingredients are well mixed, line a cupcake tray with paper liners and fill each liner 3/4 full. Then bake for 18 minutes or until a toothpick comes out clean.


        Coffee Syrup:

        While the cupcakes are baking, make the coffee syrup by whisking together the 1/4 cup coffee, 1/4 cup Kahlua, and 1/4 cup sugar in a small bowl, then set aside. 


        Mascarpone Frosting:

        To make the frosting, start by whisking 1 cup of heavy cream in an electric mixer until it forms stiff peaks.

        Then mix in 8 oz. of mascarpone and 1/4 cup powdered sugar. It should look something like the picture below!


        Cupcake Assembly:

        Once you have all of your components you can either assemble everything right away or else wait and store the components separately until you are ready to eat them! Remember, only prepare them the day that you plan to eat them!

        Ok, once you are ready to assemble the cupcakes poke holes in the tops of the cupcakes either with a toothpick or a small knife. Then, use a pastry brush to brush the coffee syrup onto the top of the cupcakes (about 5-7 coats per cupcake). Make sure to use all of the syrup! It might seem like a lot, but won't be too much!


        After brushing on all of the syrup, put the mascarpone frosting in a piping bag and pipe it onto the cupcake covering all of the holes in the top of the cupcake.


        Then dust the top of the cupcakes with cocoa powder!


        Vuala! Eat up!


        Here you can see how the coffee syrup got down into the cupcake giving it the delicious Kahlua coffee flavor!


        Yum!


        Tiramisu Cupcakes
        Ingredients:

        Vanilla Cupcakes:
        • 1 & 1/4 cups CAKE FLOUR
        • 3/4 tsp BAKING POWDER
        • 1/2 tsp SALT
        • 1/4 cup MILK
        • 2 tsp VANILLA 
        • 2 Tbs BUTTER, unsalted
        • EGGS & 3 EGG YOLKS
        • 1 cups SUGAR
        Coffee Syrup:
        • 1/4 cup STRONG COFFEE
        • 1/4 cup KAHLUA
        • 1/4 cup SUGAR
        Mascarpone Frosting:
        • 1 cups HEAVY CREAM
        • 8 oz. MASCARPONE CHEESE
        • 1/4 cup POWDERED SUGAR
        • COCOA POWDER, for dusting 

            Directions:

            Vanilla Cupcake:
            1. Preheat your oven to 325 degrees F
            2. In a medium bowl sift together the 1 & 1/4 cups cake flour, 3/4 tsp baking powder, and 1/2 tsp salt, then set aside. 
            3. Put the 2 Tbs of butter in a small microwave safe bowl and microwave in 30 second intervals until the butter has melted. Then mix in the 1/4 cup milk and 2 tsp vanilla and set aside.
            4. Add the 3 eggs, 3 egg yolk, and 1 cup sugar to the bowl of an electric mixer and whisk until the contents have almost tripled in volume. The egg mixture should be thick enough that when drizzled over itself, it will stay on the surface for a few seconds.
            5. Once the egg mixture has tripled, switch from the whisk attachment to the paddle attachment and mix in the dry mixture and milk mixture. 
            6. After all of the ingredients are well mixed, line a cupcake tray with paper liners and fill each liner 3/4 full. Then bake for 18 minutes or until a toothpick comes out clean.
            Coffee Syrup:
            1. While the cupcakes are baking, make the coffee syrup by whisking together the 1/4 cup coffee, 1/4 cup Kahlua, and 1/4 cup sugar in a small bowl, then set aside. 
            Mascarpone Frosting:
            1. To make the frosting, start by whisking 1 cup of heavy cream in an electric mixer until it forms stiff peaks.
            2. Mix in 8 oz. of mascarpone and 1/4 cup powdered sugar. It should look something like the picture below!
            Cupcake Assembly:
            1. Once you have all of your components you can either assemble everything right away or else wait and store the components separately until you are ready to eat them! Remember, only prepare them the day that you plan to eat them!
            2. Once you are ready to assemble the cupcakes poke holes in the tops of the cupcakes either with a toothpick or a small knife. Then, use a pastry brush to brush the coffee syrup onto the top of the cupcakes (about 5-7 coats per cupcake). Make sure to use all of the syrup! It might seem like a lot, but won't be too much!
            3. Put the mascarpone frosting in a piping bag and pipe it onto the cupcake covering all of the holes in the top of the cupcake.
            4. Dust the top of the cupcakes with cocoa powder.


            I found this recipe on this blog: http://alimentageuse.com/2012/11/16/tiramisu-cupcakes/

            Wednesday, November 6, 2013

            Halloween Cupcakes (Chocolate Cupcakes with Vanilla Icing)


            I made these cupcakes for a Halloween party I went to last week and they were a big hit! I used my "go to" chocolate cake recipe for the cupcakes and my new favorite vanilla icing with a little bit of orange food coloring for the icing on top!

            I also made little spider webs using chocolate almond bark. To do this I just put some melted almond bark into a sandwich baggie and cut off the tip of one of the corners. I used the baggie to pipe the spider webs onto cookie sheet. For a little more detail, read my cake decorating tip on piping with a baggie. 


            Iced cupcakes!


            Spider web cupcakes!


            Don't they look so cute??


            Ok, last picture...


            Wednesday, October 30, 2013

            Molten Chocolate Cake


            Ok, so you know how the cake in the picture above looks delicious? Well that's because it is!!! Oh my goodness, it is so good! It is warm and chocolate-y and gooey and overall just fantastic! AND it's super easy!

            To make a dozen of these wonderful cakes you will need:
            • 3/4 cup of BUTTER 
            • 12 oz. CHOCOLATE CHIPS
            • 1/2 cup HEAVY CREAM
            • EGGS
            • 3/4 cup SUGAR
            • 2/3 cup FLOUR

            Add 3/4 cup butter, the chocolate chips, and the heavy cream to a microwave safe bowl. Microwave the contents 30 second at a time, stirring in between, until the ingredients are melted together and smooth.


            Allow the mixture to cool slightly so it is no longer hot to the touch. While the mixture is cooling, prepare the cupcake pan. Either coat the cups with some extra melted butter and then sprinkle in the cocoa powder OR just put some nonstick cooking spray in the cups!


            After the chocolate mixture has cooled and is just warm, mix in the eggs, sugar, and flour. 


            Once all of the ingredients are well mixed, fill up the cups in the cupcake pan. They won't rise very much so you can fill them almost all the way to the top. Then refrigerate for a minimum of one hour (and up to a few days). 


            When you are ready to bake, preheat the oven to 450 degrees F. If you are using a regular sized cupcake pan (12 cupcakes/pan) bake them for 8-10 minutes. If you are using a large cupcake pan (6 cupcakes/pan) bake them for 13-15 minutes.

            When the cakes are done they should be set around the sides and most of the top, but be a little runny at the center. (The ones in the picture below are slightly over cooked.) Let them cool for about 5 minutes after taking them out of the oven before removing them from the pan.


            Once they have cooled, turn them out onto a cookie sheet or clean surface and get ready to enjoy! I served mine with ice cream and a little bit of chocolate syrup, but whipped cream, caramel sauce, hot fudge, or any number of other things could also make a delicious topping. I highly recommend the ice cream though!


            Look how gooey and yummy it is! They even reheat well! Just microwave for about 30 seconds!


            **** I made these cakes again and refrigerated the batter for a few days before baking and they baked up a little differently (but were still delicious!) so here are some more pictures below...

            You can see in the picture below that the cake has set around the edges but are still a little runny at the center. This is what you want!!


            Here is what it looked like when I cut into it! Warm and gooey and yummy!


            Molten Chocolate Cake

            Ingredients:
            • 3/4 cup of BUTTER 
            • 12 oz. CHOCOLATE CHIPS
            • 1/2 cup HEAVY CREAM
            • EGGS
            • 3/4 cup SUGAR
            • 2/3 cup FLOUR
            Directions:
            1. Add 3/4 cup butter, the chocolate chips, and the heavy cream to a microwave safe bowl. Microwave the contents 30 second at a time, stirring in between, until the ingredients are melted together and smooth.
            2. Allow the mixture to cool slightly so it is no longer hot to the touch. While the mixture is cooling, prepare the cupcake pan. Either coat the cups with some extra melted butter and then sprinkle in the cocoa powder OR just put some nonstick cooking spray in the cups!
            3. After the chocolate mixture has cooled and is just warm, mix in the eggs, sugar, and flour. 
            4. Once all of the ingredients are well mixed, fill up the cups in the cupcake pan. They won't rise very much so you can fill them almost all the way to the top. Then refrigerate for a minimum of one hour (and up to a few days). 
            5. When you are ready to bake, preheat the oven to 450 degrees F. If you are using a regular sized cupcake pan (12 cupcakes/pan) bake them for 8-10 minutes. If you are using a large cupcake pan (6 cupcakes/pan) bake them for 13-15 minutes. When the cakes are done they should be set around the sides and most of the top, but be a little runny at the center. (The ones in the picture below are slightly over cooked.) 
            6. Let them cool for about 5 minutes after taking them out of the oven before removing them from the pan.
            7. Once they have cooled, turn them out onto a cookie sheet or clean surface and get ready to enjoy! I served mine with ice cream and a little bit of chocolate syrup, but whipped cream, caramel sauce, hot fudge, or any number of other things could also make a delicious topping. I highly recommend the ice cream though! 
            8. They even reheat well! Just microwave for about 30 seconds!


            I found this delicious treat on this website:
            http://jennysteffens.blogspot.com/2013/04/chocolate-molten-cakes-in-cupcake-pan.html

            Thursday, October 17, 2013

            Yellow Cake with Chocolate Buttercream


            My husband's favorite type of cake is a yellow cake with chocolate icing so I have started a quest to find a good homemade recipe for just that. This is a recipe for a 3 layer 9 inch yellow cake. I used a chocolate buttercream for the icing.

            I will be honest, after tasting the cake I was a bit disappointed. If you are looking for a yellow cake to rival the Betty Crocker box cake then this is NOT it... However, the cake reminded both my husband and me (we both came to this conclusion separately) of a sweet corn bread which is peculiar because there is no corn or cornmeal in it.

            Nevertheless, I will still give you the recipe and you can see if it works out better for you. If anyone decides to give it a shot I would love to hear the results because it got rave reviews as a 'yellow cake' on the website where I found it.

            To make this cake you will need:
            • 2 sticks BUTTER, unsalted
            • 2 cups SUGAR
            • EGGS, large
            • 3 cups FLOUR
            • 4 tsp BAKING POWDER
            • 1 tsp SALT
            • 1 cup MILK
            • 2 tsp VANILLA

            Directions:
            1. Preheat your oven to 350 degrees F.
            2. Cream the butter in a stand mixer until the butter becomes fluffy. 
            3. Add the sugar to the butter and mix well.
            4. Add the eggs one at a time, making sure each in well incorporated before adding the next.
            5. In a separate bowl sift together the flour, baking powder, and salt. (or you can just use 3 cups of cake flour)
            6. Mix the flour mixture and the milk into the butter mixture alternating between flour and milk. Make sure to start and end with the flour mixture. 
            7. Mix in the vanilla.
            8. Divide the batter into 3, 9 inch cake pans that have been greased and floured. 
            9. Bake for 25 to 30 minutes!
            Note: In the pictures I halved the recipe and made a 3 layer 5 inch cake. I baked the smaller cakes for about 22 minutes. 1 batch of the chocolate buttercream should be enough to frost the layers as well as cover the cake.


            Now, to start the fun part!

            The finished product! Yay! I love decorating cakes!

            The insides!

            Aaand one more picture....


            Yellow Cake with Chocolate Buttercream

            Ingredients:
            • 2 sticks BUTTER, unsalted
            • 2 cups SUGAR
            • EGGS, large
            • 3 cups FLOUR
            • 4 tsp BAKING POWDER
            • 1 tsp SALT
            • 1 cup MILK
            • 2 tsp VANILLA
            Directions:
            1. Preheat your oven to 350 degrees F.
            2. Cream the butter in a stand mixer until the butter becomes fluffy. 
            3. Add the sugar to the butter and mix well.
            4. Add the eggs one at a time, making sure each in well incorporated before adding the next.
            5. In a separate bowl sift together the flour, baking powder, and salt. (or you can just use 3 cups of cake flour)
            6. Mix the flour mixture and the milk into the butter mixture alternating between flour and milk. Make sure to start and end with the flour mixture. 
            7. Mix in the vanilla.
            8. Divide the batter into 3, 9 inch cake pans that have been greased and floured. 
            9. Bake for 25 to 30 minutes!


            I found the cake recipe on this website: http://www.bakerella.com/finally-i-found-it/

            Wednesday, October 16, 2013

            Red Velvet Cake Taste Test!


            So last week I decided to have a little red velvet taste testing session. I compared three cake recipes and two icing recipes. This is what it did to my kitchen... and I cleaned as I went! :/


            One thing you definitely need with red velvet cake is plenty of red food coloring!


            The batters all turned out so pretty and bright!


            Ok, now to the point. The comparison! I cut three different recipe by four so I didn't have bazillions of cupcakes. 

                                                      Batter #1:                                 Batter 2:

            Batter 3:


            And here is how they cooked up!


            Ok, now onto the icings!

            The first one I tried was a flour icing and can be seen below....and I uhhh...didn't make it right and it was uhhh...pretty bad. I'll have to try that one again sometime and see if it turns out better...


            Next I made a vanilla icing with a vegetable shortening base and it was delicious! Definitely a keeper! Scroll down to the bottom of this post for the recipe!


            Cupcake #1:

            Cupcake #2:

            Cupcake #3:

            After they were all iced, it was time for the taste test! The best part!


            After tasting all of them this is what I decided:

            Cupcake 1: Very moist! Maybe too moist for a cupcake because it was hard to get out of the paper, but would be perfect for a cake. Also had great flavor! It didn't fluff up very much though.

            Cupcake 2: A little dry. Easy to get out of the paper. Didn't rise very much. Overall, not great...

            Cupcake 3: Beautiful, rose nicely. Came out of the paper easily.  Great texture. (And just so happen to be my mom's recipe! I guess mother really does know best!) Could use a little bit of a flavor boost compared to cupcake 1 though...sorry mom!

            What I decided was that I basically want to cross the 1st and 3rd cupcake to get the flavor and moistness of the 1st, but the texture and looks from the 3rd. I also decided that chocolate cake is better than red velvet cake. Sorry, I know this is supposed to be about red velvet cake, but I like my chocolate cake better!