Showing posts with label Worcestershire sauce. Show all posts

Sunday, August 10, 2014

Beef Stew


This stew was one of the first recipes that I ever made by myself (other than scrambled eggs and boxed cakes). I based it on a recipe I found online and then adapted it for what I had in my pantry. I have now made this stew many times and it is one of my favorite winter meals. The stew is warm, hearty, and rich in flavor! 

To make 2-3 serving of this beef stew you will need:
  • 2 Tbs VEGETABLE OIL
  • 1 lb. BEEF STEW MEAT (could also use chuck roast and cut it into 1 inch cubes)
  • 1 ONION, chopped 
  • 3 GARLIC cloves, minced
  • 1 Tbs TOMATO PASTE
  • 3 cups BEEF STOCK
  • 2 BAY LEAVES
  • 1/2 tsp SUGAR
  • 1/4 tsp PEPPER
  • 1/4 tsp ALLSPICE
  • 1/4 tsp PAPRIKA
  • 1 Tbs WORCESTERSHIRE SAUCE
  • 3-4 CARROTS, chopped
  • 1 lb. POTATOES, peeled and cubed 
  • 1-2 cups WATER

Pour the vegetable oil into a large pot over medium-high heat. Once the oil is hot, brown the beef in the oil. 


When the beef is browned, but not necessarily cooked through (it will continue to cook throughout the rest of the preparation) stir in the onion, garlic, and tomato paste.


Next, stir in the beef stock, bay leaves, sugar, pepper, allspice, paprika, and Worcestershire sauce. Cover and allow the stew to simmer for about 1 & 1/2 hours.


Add the carrots and potatoes. If the liquid does not mostly cover the meat and vegetables, add 1-2 cups of water. Then simmer for another 30 minutes.

(Not enough liquid!)
(Perfect!)
Once the carrots and potatoes are tender, taste the broth and season as needed. Remove the bay leaves and serve! 


The beef tastes tender and juicy while to potatoes are soft and flavorful! This is a great comfort dish!


I am already looking forward to making this again!


Beef Stew
Ingredients:
  • 2 Tbs VEGETABLE OIL
  • 1 lb. BEEF STEW MEAT (could also use chuck roast and cut it into 1 inch cubes)
  • ONION, chopped 
  • GARLIC cloves, minced
  • 1 Tbs TOMATO PASTE
  • 3 cups BEEF STOCK
  • BAY LEAVES
  • 1/2 tsp SUGAR
  • 1/4 tsp PEPPER
  • 1/4 tsp ALLSPICE
  • 1/4 tsp PAPRIKA
  • 1 Tbs WORCESTERSHIRE SAUCE
  • 3-4 CARROTS, chopped
  • 1 lb. POTATOES, peeled and cubed 
  • 1-2 cups WATER
Directions:
  1. Pour the vegetable oil into a large pot over medium-high heat. Once the oil is hot, brown the beef in the oil. 
  2. When the beef is browned, but not necessarily cooked through (it will continue to cook throughout the rest of the preparation) stir in the onion, garlic, and tomato paste.
  3. Next, stir in the beef stock, bay leaves, sugar, pepper, allspice, paprika, and Worcestershire sauce. Cover and allow the stew to simmer for about 1 & 1/2 hours.
  4. Add the carrots and potatoes. If the liquid does not mostly cover the meat and vegetables, add 1-2 cups of water. Then simmer for another 30 minutes.
  5. Once the carrots and potatoes are tender, taste the broth and season as needed. Remove the bay leaves and serve! 


    The recipe I based this one on was Paula's: http://www.foodnetwork.com/recipes/paula-deen/old-time-beef-stew-recipe/index.html

    Sunday, February 16, 2014

    Hot Roast Beef Sandwich


    These delicious roast beef sandwiches are perfect for lunch! (...or dinner, you just might want to eat two!) They are simple to make and are easily made ahead of time! The cheese in the sandwich gets gooey when you heat it up and the sauce has a nice tangy flavor from the horseradish and mustard. Pair that with the thinly sliced roast beef and you get a perfect balance of flavors!

    To make 5 sandwiches (which could be a weeks worth of lunches!) you will need:
    • HAMBURGER BUNS
    • 7 oz. ROAST BEEF, thinly sliced
    • 5 slices of PROVOLONE CHEESE
    • 5 slices of AMERICAN CHEESE 
    • ALUMINUM FOIL
    For the sauce you will need:
    • 2 Tbs MAYO
    • 2 Tbs SPICY MUSTARD
    • 1/2 to 1 Tbs POPPY SEEDS (I used 1 Tbs, but next time I will probably cut back)
    • 1 Tbs CHOPPED ONIONS
    • 1/2 Tbs HORSERADISH
    • Dash of WORCESTERSHIRE SAUCE

    If you plan on eating a sandwich right after making them, preheat your oven to 350 degrees F. Then, mix together the mayo, spicy mustard, poppy seeds, chopped onions, horseradish, and Worcestershire sauce in a small bowl.


    It should look something like this!


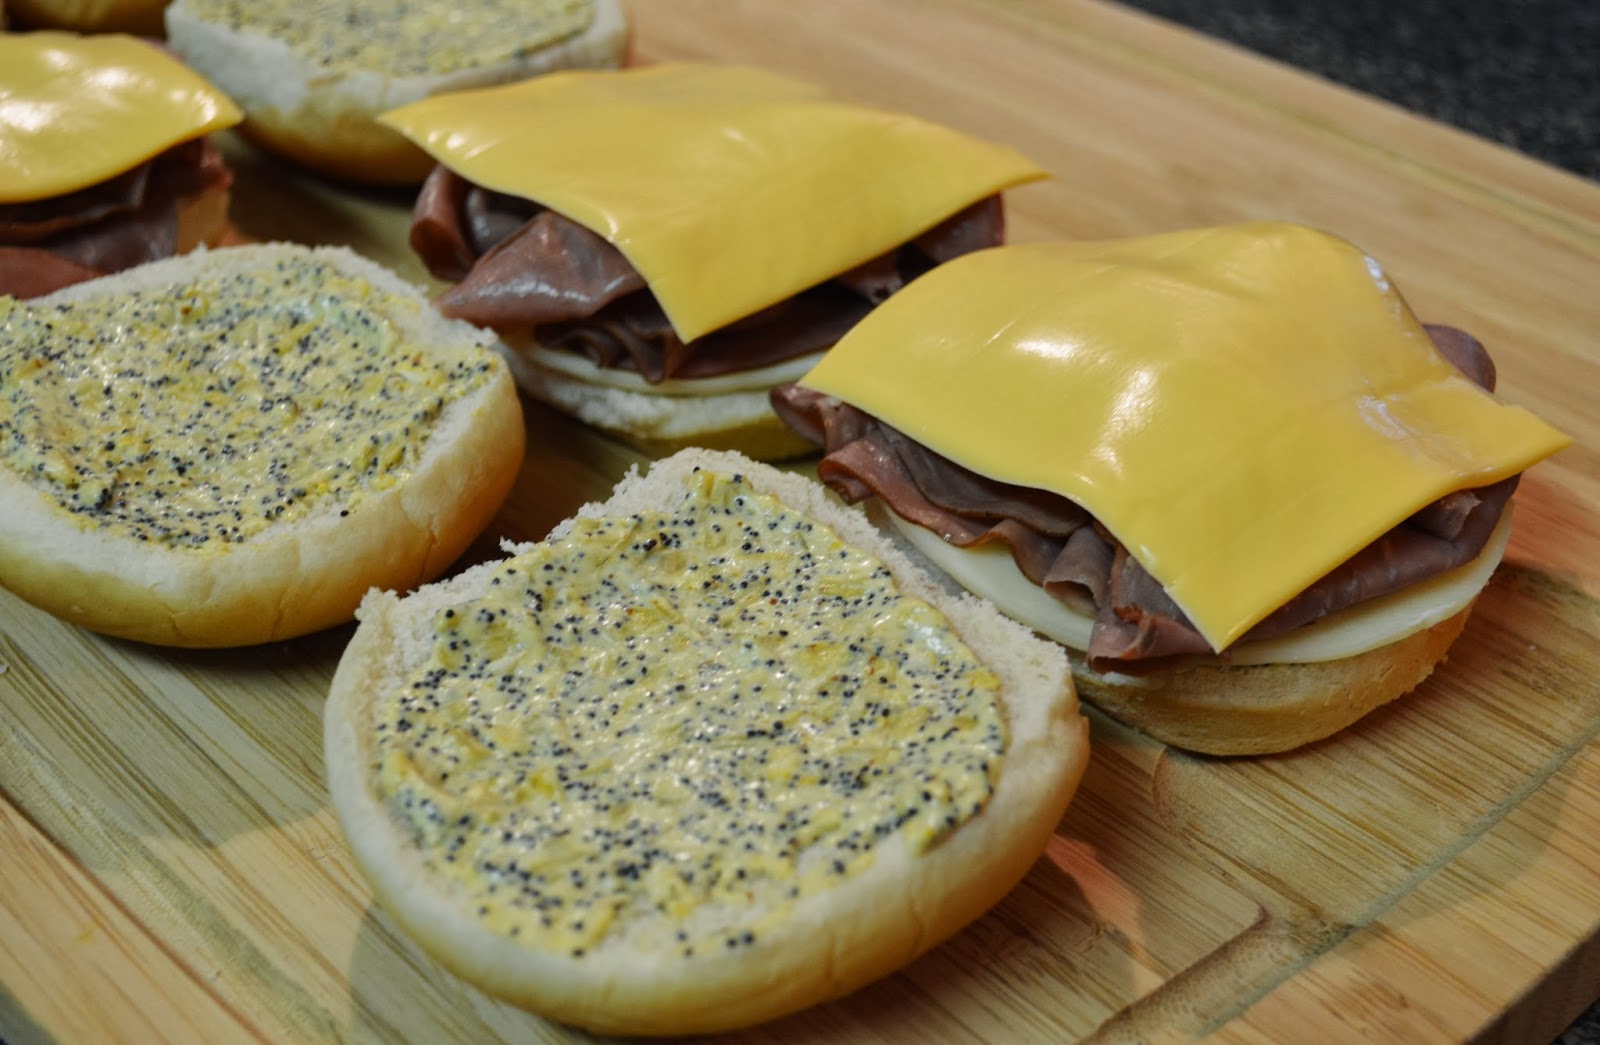
    Then, spread the sauce onto the inside of both pieces of each bun.


    Next, place a slice of provolone onto the bottom bun...


    ...then put the roast beef on top of the provolone (I used about 3 slices of roast beef per sandwich)...


    ...then put the American cheese on top of the roast beef...


    ...and lastly, place the top half of the bun on top!


    Repeat this process for all of the sandwiches (...or just do it all at once like I do!).


    Now, you could eat the sandwich as is, but I like to take it a step further. I wrap each sandwich in foil... 


    ...and then pop them in the oven at 350 degrees F for 15 to 20 minutes. If you don't have an oven handy, then just warm the sandwiches in the microwave until the cheese gets gooey! (DON'T PUT THE FOIL INTO THE MICROWAVE!)


    If you don't want to eat them all at once, simply put the foil wrapped sandwiches in to a large baggie and pop the baggie into the fridge! If you don't plan on eating all of the sandwiches in about a week and a half, then pop the baggie into the freezer! They will last several months in the freezer!


     Yum! Look how gooey and melted the cheese is!
      

    Once the cheese is melted, sit back and enjoy!


    Hot Roast Beef Sandwich

    Ingredients:
      
    To make 5 sandwiches you will need:
    • HAMBURGER BUNS
    • 7 oz. ROAST BEEF, thinly sliced
    • 5 slices of PROVOLONE CHEESE
    • 5 slices of AMERICAN CHEESE 
    • ALUMINUM FOIL
    For the sauce you will need:
    • 2 Tbs MAYO
    • 2 Tbs SPICY MUSTARD
    • 1/2 to 1 Tbs POPPY SEEDS (I used 1 Tbs, but next time I will probably cut back)
    • 1 Tbs CHOPPED ONIONS
    • 1/2 Tbs HORSERADISH
    • Dash of WORCESTERSHIRE SAUCE

        Directions:
        1. If you plan on eating a sandwich right after making them, preheat your oven to 350 degrees F. Then, mix together the mayo, spicy mustard, poppy seeds, chopped onions, horseradish, and Worcestershire sauce in a small bowl.
        2. Spread the sauce onto the inside of both pieces of all of the buns.
        3. Next, place a slice of provolone onto the bottom bun, then put the roast beef on top of the provolone (I used about 3 slices of roast beef per sandwich), then put the American cheese on top of the roast beef, and lastly, place the top half of the bun on top!
        4. Now, you could eat the sandwich as is, but I like to take it a step further. I wrap each sandwich in foil and then pop them in the oven at 350 degrees F for 15 to 20 minutes. If you don't have an oven handy, then just warm the sandwiches in the microwave until the cheese gets gooey! (DON'T PUT THE FOIL INTO THE MICROWAVE!)
        5. If you don't want to eat them all at once, simply put the foil wrapped sandwiches in to a large baggie and pop the baggie into the fridge! If you don't plan on eating all of the sandwiches in about a week and a half, then pop the baggie into the freezer! They will last several months in the freezer!


          I got this recipe from the Pioneer Woman: http://www.foodnetwork.com/recipes/ree-drummond/hot-roast-beef-sandwiches.html

          Thursday, January 23, 2014

          Stuffed Peppers


          These stuffed peppers are great! They are sweet from the red pepper and a little bit spicy from all of the seasonings in the filling. I have seen other people make stuffed peppers, but I had never actually made them so this it sort of a combination of things I've had before and things that I just thought sounded good! And it worked out!

          To make these delicious stuffed peppers you will need:
          • 8 oz. GROUND BEEF
          • 1/2 a SMALL ONION, diced
          • 3/4 cup COOKED RICE (1/4 cup uncooked rice)
          • 3/4 tsp CUMIN
          • 1/2 tsp CHILI POWDER
          • 1/2 tsp GARLIC POWDER
          • 1/4 tsp CAYENNE PEPPER
          • 1/4 tsp SALT
          • 1/4 tsp PAPRIKA
          • 2 tsp WORCESTERSHIRE SAUCE
          • 1/4 cup + 2 Tbs CHEDDAR CHEESE, shredded
          • 1/4 cup CRUSHED TOMATOES
          • RED BELL PEPPERS (or a different color bell pepper)

          Preheat your oven to 350 degrees F. Start off by browning the ground beef in a skillet with the diced onion. 


          Once the beef is cooked, add the spices and Worcestershire sauce.


          Now you could either leave the ground beef and onion in the skillet or transfer it to a bowl. Then, mix in the rice.


          Next, mix in 1/4 cup of cheese. Then, add the crushed tomato. It should look something like the picture below!


          Cut off the tops of the peppers and carve out all of the veins and seeds. This will open the pepper up so you can stuff lots of filling in!


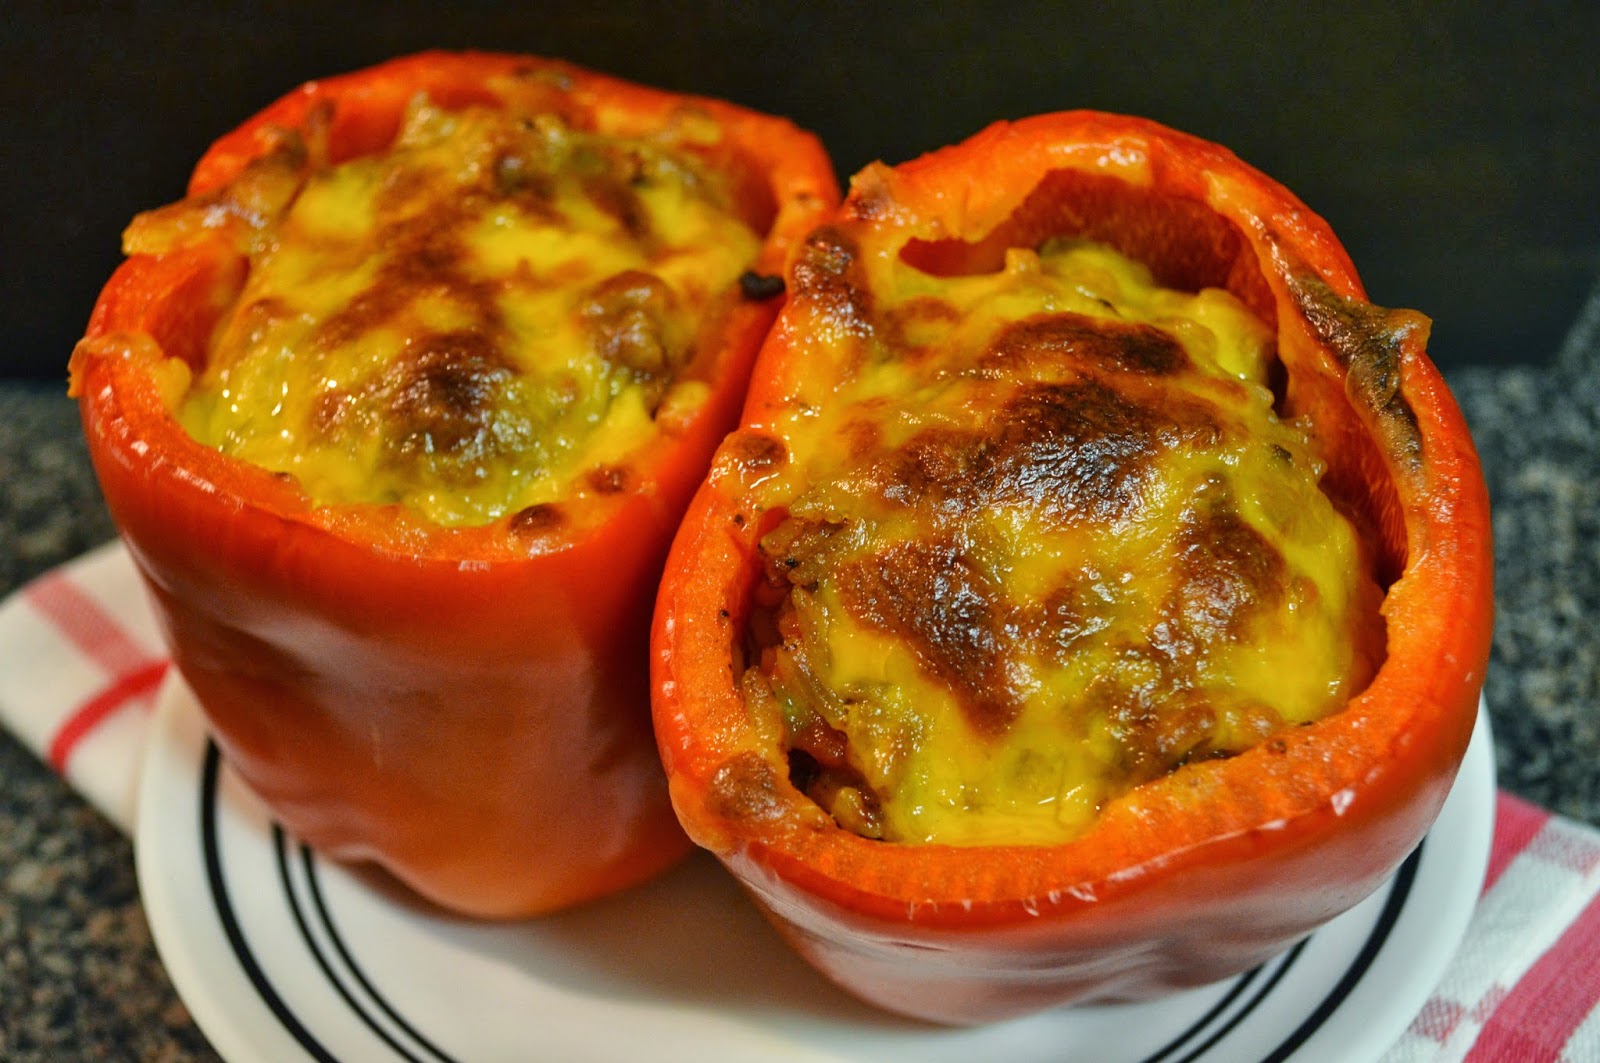
          Then, you guessed it, stuff the filling in!


          Sprinkle the remaining 2 tablespoons of cheese on top of the peppers.


          Place the peppers on a baking pan and cover the top with foil. Bake for 30 minutes.


          To brown the cheese on top you can either remove the foil from the top of the peppers for the last 5-10 minutes, or after the 30 minutes, remove the foil and turn the broiler on for a few minutes. Make sure to keep an eye on it though!


          Stuffed Peppers

          Ingredients:
          • 8 oz. GROUND BEEF
          • 1/2 a SMALL ONION, diced
          • 3/4 cup COOKED RICE (1/4 cup uncooked rice)
          • 3/4 tsp CUMIN
          • 1/2 tsp CHILI POWDER
          • 1/2 tsp GARLIC POWDER
          • 1/4 tsp CAYENNE PEPPER
          • 1/4 tsp SALT
          • 1/4 tsp PAPRIKA
          • 2 tsp WORCESTERSHIRE SAUCE
          • 1/4 cup + 2 Tbs CHEDDAR CHEESE, shredded
          • 1/4 cup CRUSHED TOMATOES
          • RED BELL PEPPERS (or a different color bell pepper)
          Directions:
          1. Preheat your oven to 350 degrees F. Start off by browning the ground beef in a skillet with the diced onion. 
          2. Once the beef is cooked, add the spices and Worcestershire sauce. 
          3. Now you could either leave the ground beef and onion in the skillet or transfer it to a bowl. Then, mix in the rice, 1/4 cup of cheese, and the crushed tomato. 
          4. Cut off the tops of the peppers and carve out all of the veins and seeds. This will open the pepper up so you can stuff lots of filling in!
          5. Then, you guessed it, stuff the filling in!
          6. Sprinkle the remaining 2 tablespoons of cheese on top of the peppers. 
          7. Place the peppers on a baking pan and cover the top with foil. Bake for 30 minutes
          8. To brown the cheese on top you can either remove the foil from the top of the peppers for the last 5-10 minutes, or after the 30 minutes, remove the foil and turn the broiler on for a few minutes. Make sure to keep an eye on it though!


            Friday, January 10, 2014

            Maryland Jumbo Lump Crab Cakes


            A couple months ago my mom came to visit us in Maryland and we decided to go out and get some crab cakes! When in Rome, right? Unfortunately, they were not all that we had hoped they would be. After our disappointing experience we decided that next time we wanted crab cakes we would try our hand at making them ourselves. They sell FRESH jumbo lump crab meat in the grocery store here for goodness sake!

            I came up with this recipe by combining a few things that we did like about the crab cakes we tried with mom and a few things I found in some recipes online. I think the product turn out wonderfully! These crab cake are only about 150 calories each so they definitely won't break your new year's resolutions!

            To make 4 wonderful crab cakes (2 per person) you will need:
            • 8 oz. JUMBO LUMP CRAB MEAT
            • 1 slice WHITE BREAD, torn into small pieces
            • 1/4 cup PLAIN BREAD CRUMBS
            • 1 Tbs FRESH PARSLEY, minced
            • LARGE EGG
            • 2 Tbs MAYO
            • 1 tsp OLD BAY SEASONING (If I have learned anything since moving here, it's that Marylanders love their Old Bay!!)
            • pinch of GARLIC POWDER
            • 2 tsp WORCESTERSHIRE SAUCE
            • 1/4 tsp DIJON MUSTARD

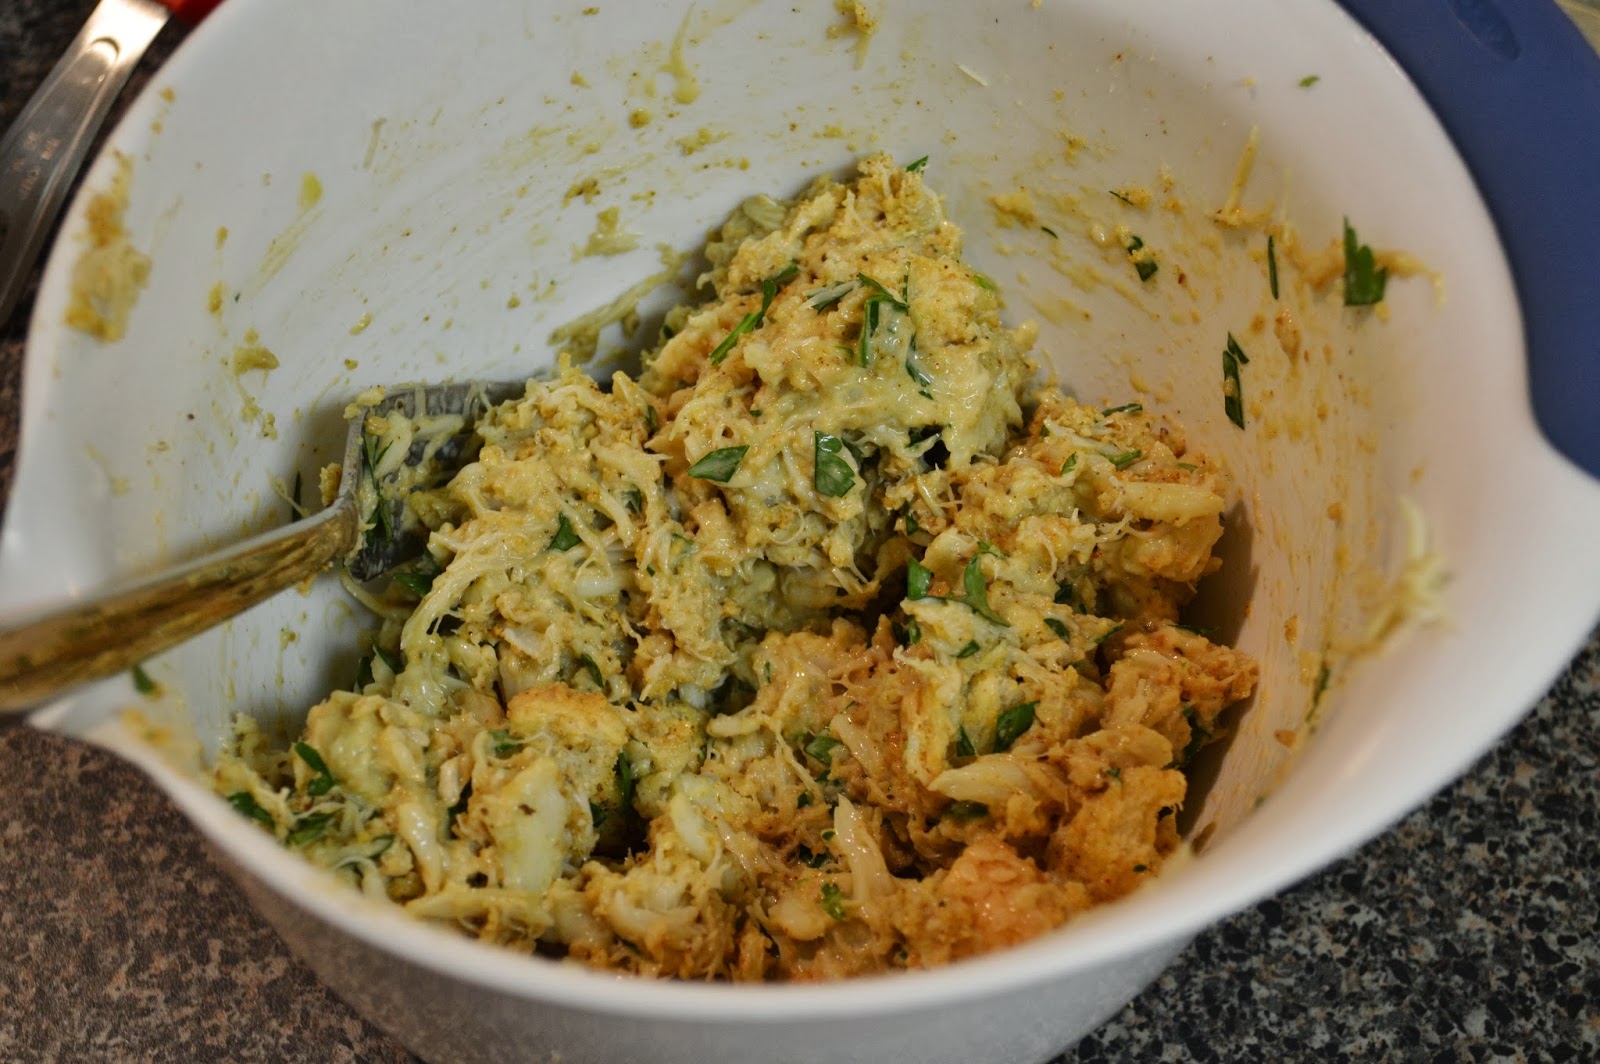
            Start off by gently mixing the jump lump crab meat, white bread chunks, bread crumbs, and parsley in medium sized bowl. Be careful not to break up lumps of crab meat!


            Then mix together the egg, mayo, seasonings, Worcestershire sauce, and mustard in a small bowl.


            Next, carefully mix the wet ingredients into the dry ingredients.


            Divide the mixture into fourths and shape each section into a patty. Lay the patties on a greased cookie sheet and broil on high for 10-15 minutes with the oven rack near the top. If the cakes start to get too dark on top, lower the oven rack or turn the broiler to low.


            They should come out looking like this!


            Eat up! We didn't use a dipping sauce (I don't think these cakes need it!), but if you would like to try some, people often dip the cakes in tartar sauce or cocktail sauce with some lemon drizzled over the top!


            Maryland Jumbo Lump Crab Cakes

            Ingredients:
            • 8 oz. JUMBO LUMP CRAB MEAT
            • 1 slice WHITE BREAD, torn into small pieces
            • 1/4 cup PLAIN BREAD CRUMBS
            • 1 Tbs FRESH PARSLEY, minced
            • LARGE EGG
            • 2 Tbs MAYO
            • 1 tsp OLD BAY SEASONING (If I have learned anything since moving here, it's that Marylanders love their Old Bay!!)
            • pinch of GARLIC POWDER
            • 2 tsp WORCESTERSHIRE SAUCE
            • 1/4 tsp DIJON MUSTARD

            Directions:
            1. Start off by gently mixing the jump lump crab meat, white bread chunks, bread crumbs, and parsley in medium sized bowl. Be careful not to break up lumps of crab meat!
            2. Then mix together the egg, mayo, seasonings, Worcestershire sauce, and mustard in a small bowl.
            3. Next, carefully mix the wet ingredients into the dry ingredients.
            4. Divide the mixture into fourths and shape each section into a patty. Lay the patties on a greased cookie sheet and broil on high for 10-15 minutes with the oven rack near the top. If the cakes start to get too dark on top, lower the oven rack or turn the broiler to low.


                Sunday, November 17, 2013

                Chicken Yakisoba


                My husband and I have been cooking food with a lot of Asian flavors lately and one of our favorite ways to do this is in a stir-fry! This recipe is great because (unlike most Asian recipes I've found) it doesn't require you to go out and buy 5 different kinds of sauces and oils that will most likely sit it the back of your fridge unused for the foreseeable future.

                Another thing I like about this recipe is that it uses a few ingredients that I have come to know as 'staples' in the college kitchen and elevates the flavors to another level. Can you guess what they are?  Ramen noodles and Sriracha hot sauce of course!

                To make my twist on a chicken yakisoba you will need:
                • 2 medium CARROTS
                • 1 large crown of BROCCOLI
                • 1 medium ONION
                • CHICKEN BREAST
                • 2 Tbs VEGETABLE OIL
                • 2 (3 oz.) packages RAMEN NOODLES (Discard the seasoning packets! We will find flavors in other ingredients!)
                • Optional: 1 tsp SESAME OIL
                • SALT
                • PEPPER
                For the sauce you will need:
                • 1/4 cup SOY SAUCE
                • 1/4 cup WORCESTERSHIRE SAUCE
                • 2 Tbs KETCHUP
                • 1/2 Tbs SRIRACHA HOT SAUCE (if you like a lot of spice you could add another 1/2 Tbs)

                Ok, before you start cooking anything you are going to have to spend some time chopping veggies. Peel the carrots and then grate them using a cheese grater with large holes. Next, cut the broccoli into bite-sized pieces. Then slice the onion into strips. And lastly, cut the chicken into thin strips and then cut the strips into bite-sized pieces. (I do the chicken last, so I don't have to use more than 1 cutting board and knife.)

                In a medium bowl whisk together 1/4 cup soy sauce, 1/4 cup Worcestershire sauce, 2 tablespoons ketchup, and 1/2 tablespoon of sriracha. Then set it aside for later.

                Once you are ready to start cooking, bring a medium sized pot of water to a boil and cook the Ramen noodles for 2-3 minutes or until they are just barely under-cooked. Then drain the noodles and mix in 1 tsp of sesame oil to keep the noodles from sticking together.

                Next, heat 1 tablespoon of oil on medium-high heat in a large skillet. Once the oil is hot, cook the chicken for 5-10 minutes or until the chicken is cooked. Sprinkle chicken with a pinch of salt and pepper. When the chicken is cooked through set it aside in a small bowl. (Ideally you could just keep adding things to the skillet and not have to take the chicken out, but unfortunately my large skillet is not bottomless...)

                Add another tablespoon of oil to the (now empty) large skillet. When the oil is hot, add the onion and cook it for 1-2 minutes, continuously stirring, until the strips start to get tender. Then add in the broccoli and cook for another 2-3 minutes. Don't forget to keep stirring! The broccoli will start to turn a beautiful bright green! Next, add the grated carrots and cook, still stirring, for 1-2 more minutes.


                Now, that the veggies are almost cooked through and tender, add your chicken back in to warm it back up. Once all of the ingredients are hot, slowly start adding the sauce while continually tossing the ingredients in the skillet to keep everything hot. Lastly, add the noodles and continue tossing everything is the sauce. Once everything is well mixed together and hot serve it up!


                 Close up!


                Chicken Yakisoba
                Ingredients:
                • 2 medium CARROTS
                • 1 large crown of BROCCOLI
                • 1 medium ONION
                • CHICKEN BREAST
                • 2 Tbs VEGETABLE OIL
                • 2 (3 oz.) packages RAMEN NOODLES (Discard the seasoning packets! We will find flavors in other ingredients!)
                • Optional: 1 tsp SESAME OIL
                • SALT
                • PEPPER
                • 1/4 cup SOY SAUCE
                • 1/4 cup WORCESTERSHIRE SAUCE
                • 2 Tbs KETCHUP
                • 1/2 Tbs SRIRACHA HOT SAUCE (if you like a lot of spice you could add another 1/2 Tbs)

                    Directions:
                    1. Peel the carrots and then grate them using a cheese grater with large holes. Next, cut the broccoli into bite-sized pieces. Then slice the onion into strips. And lastly, cut the chicken into thin strips and then cut the strips into bite-sized pieces. (I do the chicken last, so I don't have to use more than 1 cutting board and knife.)
                    2. In a medium bowl whisk together 1/4 cup soy sauce, 1/4 cup Worcestershire sauce, 2 tablespoons ketchup, and 1/2 tablespoon of sriracha. Then set it aside for later.
                    3. Once you are ready to start cooking, bring a medium sized pot of water to a boil and cook the Ramen noodles for 2-3 minutes or until they are just barely under-cooked. Then drain the noodles and mix in 1 tsp of sesame oil to keep the noodles from sticking together.
                    4. Next, heat 1 tablespoon of oil on medium-high heat in a large skillet. Once the oil is hot, cook the chicken for 5-10 minutes or until the chicken is cooked. Sprinkle chicken with a pinch of salt and pepper. When the chicken is cooked through set it aside in a small bowl. (Ideally you could just keep adding things to the skillet and not have to take the chicken out, but unfortunately my large skillet is not bottomless...)
                    5. Add another tablespoon of oil to the (now empty) large skillet. When the oil is hot, add the onion and cook it for 1-2 minutes, continuously stirring, until the strips start to get tender. Then add in the broccoli and cook for another 2-3 minutes. Don't forget to keep stirring! The broccoli will start to turn a beautiful bright green! Next, add the grated carrots and cook, still stirring, for 1-2 more minutes.
                    6. Now, that the veggies are almost cooked through and tender, add your chicken back in to warm it back up. Once all of the ingredients are hot, slowly start adding the sauce while continually tossing the ingredients in the skillet to keep everything hot. Lastly, add the noodles and continue tossing everything is the sauce. Once everything is well mixed together and hot serve it up!


                    I based this recipe on the one I found on this website: http://www.budgetbytes.com/2012/03/chicken-yakisoba/

                    Wednesday, October 30, 2013

                    Pork Tenderloin Marinade with Pan Sauce


                    For dinner tonight we made this pork tenderloin with a pan sauce and it turned out REALLY delicious!
                    To make the marinade for the pork tenderloin you will need:
                    • 1/2 cup OLIVE OIL
                    • 1/3 cup SOY SAUCE
                    • 1/4 cup RED WINE VINEGAR
                    • Juice of 1 LEMON
                    • 1-2 Tbs WORCESTERSHIRE SAUCE
                    • 1 Tbs DRIED PARSLEY
                    • 2 tsp YELLOW MUSTARD
                    • PEPPER, to taste
                    • 4 cloves of GARLIC
                    • 1 lb. PORK TENDERLOIN
                    To make the pan sauce you will need:
                    • 3 Tbs of the PORK MARINADE
                    • 2 tsp BUTTER
                    • 1/2 cup CHICKEN BROTH
                    In a large baggie combine all of the above ingredients. Mix the ingredients well and then allow the pork to sit in the marinade for at least 3-4 hours.


                    After the pork has marinaded, preheat the oven to 350 degrees F. While the oven is preheating, sear all sides of the pork tenderloin in a skillet over medium-high heat.


                    Then bake the pork along with the marinade in a baking pan for 30-40 minutes. When the pork is cooked through, let the pork rest for 5 minutes before cutting into it.


                    While the pork is resting prepare the pan sauce. To make the sauce combine 3 tablespoons of the marinade, the pan scrapings from the pork, the butter, and the chicken broth in a small pan over medium heat. Heat for a 2-3 minutes. Once the sauce is mixed together and hot it's ready!


                    Slice the tenderloin, and pour the sauce over the top! Boom, you're done!


                    Pork Tenderloin Marinade with Pan Sauce

                    Ingredients:
                    • 1/2 cup OLIVE OIL
                    • 1/3 cup SOY SAUCE
                    • 1/4 cup RED WINE VINEGAR
                    • Juice of 1 LEMON
                    • 1-2 Tbs WORCESTERSHIRE SAUCE
                    • 1 Tbs DRIED PARSLEY
                    • 2 tsp YELLOW MUSTARD
                    • PEPPER, to taste
                    • 4 cloves of GARLIC
                    • 1 lb. PORK TENDERLOIN
                    To make the pan sauce you will need:
                    • 3 Tbs of the PORK MARINADE
                    • 2 tsp BUTTER
                    • 1/2 cup CHICKEN BROTH

                        Directions:
                        1. In a large baggie combine all of the above ingredients. Mix the ingredients well and then allow the pork to sit in the marinade for at least 3-4 hours.
                        2. After the pork has marinaded, preheat the oven to 350 degrees F. While the oven is preheating, sear all sides of the pork tenderloin in a skillet over medium-high heat.
                        3. Bake the pork along with the marinade in a baking pan for 30-40 minutes. When the pork is cooked through, let the pork rest for 5 minutes before cutting into it.
                        4. While the pork is resting prepare the pan sauce. To make the sauce combine 3 tablespoons of the marinade, the pan scrapings from the pork, the butter, and the chicken broth in a small pan over medium heat. Heat for a 2-3 minutes. Once the sauce is mixed together and hot it's ready! 
                        5. Slice the tenderloin, and pour the sauce over the top! Boom, you're done!


                          I found this delicious recipe on this website:
                          http://chefmommy-brandao.blogspot.ca/2012/03/pork-tenderloin-with-pan-sauce.html