Showing posts with label icing. Show all posts

Friday, February 14, 2014

Valentine's Sugar Cookies

Here is one more Valentine's treat! Every year the collegiate chapter of Sigma Alpha Iota that I was initiated into has a bake sale for Valentine's Day. They usually have 2-3 bake sales a year and as a member I always got really excited when one started to get close because that meant I got to bake something! So this year, even though I have now graduated, I decided to make a special treat to send to the girls for the bake sale! I'll use any excuse I can find to bake something! ;)

I decided to make some Valentine's sugar cookies so I could try out a new decorating technique and I think they turned out pretty well! I forgot to take pictures until the last minute so that is why most of the pictures are of the cookies already bagged and in the box!

I think this one was my favorite! I didn't plan on making black (or I guess dark grey) and white flowers, but I started running out of pink so I gave it a try and I think they turned out beautifully!

These were probably my second favorite, simple, yet pretty! I probably need to get some more practice with writing on cookies though... 

Onto the box pictures! Haha. Here is the first layer of cookies that went into the box! So pretty! I will definitely make these again!

...and the second layer!

...and the top layer! 

I hope you liked my cookies because I sure enjoyed making them!


Thursday, December 19, 2013

Piping Bag Tip!


I found this tip on another blog recently and it has changed the way I handle icing! There is no longer a need to clean piping bags! All you need is cling wrap!

Start off by tearing off a square of cling wrap and laying it out on a clean surface. Then place the icing you plan to use in the middle of the square. 


Fold the cling wrap diagonally in half. (Corner to corner)


Next, roll the cling wrap around the icing in the middle (like a piece of candy). 


Then twist the ends until tight. 


Then slide one end of the cling wrap through the coupler in a piping bag. 


Cut off the plastic wrap poking out of the coupler. 


Then put on your tip, the other half of the coupler, and start piping! 


Once you are done and all of the icing is gone, simply remove the top part of the coupler and the piping tip. Then pull the cling wrap with the residual icing out of the bigger end of the piping bag! You will most likely have to clean the bottom part of the coupler, but that is so much better than having to clean out the piping bag as well!!


I found this genius tip on the following blog: http://www.sweetsugarbelle.com/2011/03/coloring-and-preparing-royal-icing/

Wednesday, December 11, 2013

Christmas Sugar Cookies


I just opened a shop on Etsy and these beautiful Christmas cookies are for sale!!

These scrumptious sugar cookies are perfect for holiday parties, gifts, or just to create a little extra holiday cheer! Each cookie is hand decorated with vanilla royal icing and range in height from 3.25'' to 3.75''. For more information go to: https://www.etsy.com/shop/TheHungryHood

Please message me if you have any questions about the cookies, or special requests!

Scroll down for some close up shots of the cookies!

Snowman:

Christmas Stocking #1:


Christmas Stocking #2:

Christmas Tree:

Candy Cane:

Stars:

Another shot of all the cookies!

Tuesday, December 3, 2013

Thanksgiving 2013

I had such a wonderful Thanksgiving this year! My husband and I recently moved away from where our families live, but we were lucky enough to have our siblings and one of my closest friends come visit us for the holiday!

We ended up having a total of 8 people over for Thanksgiving dinner this year so I took full advantage having so many people to cook for and made all kinds of things!

I started off Thanksgiving week by making some kolaches, which are traditional Czechoslovakian pastries. They are made of a sweet dough and generally have a fruity filling. I made my brother and my favorite flavor, cherry!


Look how gooey and yummy they were! I will post the recipe for these soon!


Then, my brother helped me make my favorite spinach artichoke dip to snack on during Thanksgiving day!


We even made the bread! I used the crusty bread recipe, but rather than shaping it into a ball I shaped it into a loaf. 


My husband made his favorite Thanksgiving food, dressing!


My husband and I decided that rather than making turkey for Thanksgiving, we wanted to make a ham. Some of our guests on the other hand, decided that they could not have Thanksgiving without a turkey. So one of them volunteered to make a turkey....and then another one volunteered to make a turkey... and then there was a little bit of a miscommunication and we ended up with 2 turkeys!!!

Here is a picture of turkey #1, your classic turkey:


And here is turkey #2, the 'burkey':


And here is the ham that we made:


And here are the sides! We had mashed potatoes, sauteed Brussels sprouts, sweet potato casserole, potato salad, dressing, green bean casserole, and rolls! Whew! That was a lot of food! And it was all so good!


Here is a picture of the guys trying to figure out how to carve their birds!


And here is my plate! Look at all of that delicious food!


We weren't done yet! Now time for the desserts! My friend and I started off by making Oreo balls! They are super easy to make and so good! They are the perfect dessert for a chocoholic!


And then we made a mini carrot cake using my mother-in-law's recipe! It was so delicious!


Look at that yummy cake!


Welp, that's all! I will be posting some of the recipes for things that we made over the next few weeks. If you have any questions or recipe requests just let me know! Happy Thanksgiving!

Saturday, November 23, 2013

Can you freeze cupcake batter and still have good cupcakes? YES!!!


I ran a little experiment regarding freezing cupcake batter and it totally worked! I have heard a lot of different things about whether or not the cupcakes would look or (more importantly) taste as good after freezing the batter so I set out to find the truth! 

This experiment actually started off as an accident. I was making a half batch of chocolate cupcakes for a party and ended up forgetting to half one of the ingredients. So rather than starting over, I just made a whole batch. You can never have too many cupcakes right??

I baked up half of the batter that night for the party and poured the other half in to a large baggie and popped it into the freezer. 


Then, about 3 weeks later, I defrosted the batter and baked some cupcakes. The cupcakes in the picture below were made from frozen batter and don't they look wonderful?!


Then I whipped up some vanilla icing and dug in! They tasted just as wonderful as usual! 

Now here is the tip: If you are really busy, make your cake batter ahead of time and freeze it until you need it! Just defrost the batter overnight, or while you are at work, and you can have cupcakes made from scratch any day of the week!


----------------------------------------------------------------------------------------------------------------------------------------------------
Chocolate Cake with Vanilla Icing

Ingredients:

Chocolate Cake:
  • 2 cups SUGAR
  • 1 & 3/4 cup FLOUR
  • 3/4 cup COCOA POWDER
  • 1 & 1/2 tsp BAKING POWDER
  • 1 & 1/2 tsp BAKING SODA
  • 1 tsp SALT
  • EGGS
  • 1 cup MILK
  • 1/2 cup VEGETABLE OIL
  • 2 tsp VANILLA EXTRACT
  • 1 cup BOILING WATER
Vanilla Icing:
  • 2 cup SHORTENING 
  • 8 cup POWDERED SUGAR
  • 0.5 tsp SALT
  • 2 tsp VANILLA
  • 6 oz. HEAVY CREAM

      Directions:


      Chocolate Cake:
      1. Preheat the oven to 350 degrees F and coating three 8 inch baking dishes in nonstick cooking spray and then flour to make the cake easier to remove from the dish after baking. 
      2. In an electric mixer combine the sugar, flour, cocoa powder, baking powder, baking soda, and salt. 
      3. Add the eggs, milk, vegetable oil, vanilla extract, and the boiling water making sure each ingredient is incorporated before adding the next.
        • If you are making a cake, divide the batter equally into the three baking dishes and bake for 30-35 minutes.  Bake until you can insert a toothpick and have it come out clean. Let the cakes cool for at least 10 minutes before removing from the baking dishes. 
           OR
        • If you are making cupcakes with the batter, bake them for 15-18 minutes or until you can insert a toothpick and have it come out clean.

          Vanilla Icing:
          1. Cream the shortening in an electric mixer until it is fluffy. 
          2. Slowly mix in the powdered sugar. 
          3. Add the salt, vanilla, and cream. Mix until well combined. 
          4. If it is too thick add more cream, if it is too thin add more powdered sugar.
            ----------------------------------------------------------------------------------------------------------------------------------------------------

            Sunday, November 10, 2013

            Tiramisu Cupcakes


            If you like tiramisu and you like cupcakes then you will definitely LOVE these tiramisu cupcakes! The cakes are vanilla and are brushed with a coffee liquor syrup and topped with a delicious mascarpone frosting! This recipe will make about 18 cupcakes. 

            Tip: Be sure to make these cupcakes on the day you plan to serve them. You could make the components ahead of time, but don't assemble them until the day of! Due to the coffee syrup being brushed onto the cupcakes, they they start to taste a little soggy after a day or two. 

            Vanilla Cupcakes:
            • 1 & 1/4 cups CAKE FLOUR
            • 3/4 tsp BAKING POWDER
            • 1/2 tsp SALT
            • 1/4 cup MILK
            • 2 tsp VANILLA 
            • 2 Tbs BUTTER, unsalted
            • EGGS & 3 EGG YOLKS
            • 1 cups SUGAR
            Coffee Syrup:
            • 1/4 cup STRONG COFFEE
            • 1/4 cup KAHLUA
            • 1/4 cup SUGAR
            Mascarpone Frosting:
            • 1 cups HEAVY CREAM
            • 8 oz. MASCARPONE CHEESE
            • 1/4 cup POWDERED SUGAR
            • COCOA POWDER, for dusting 

            Preheat your oven to 325 degrees F. In a medium bowl sift together the 1 & 1/4 cups cake flour, 3/4 tsp baking powder, and 1/2 tsp salt, then set aside. 

            Put the 2 Tbs of butter in a small microwave safe bowl and microwave in 30 second intervals until the butter has melted. Then mix in the 1/4 cup milk and 2 tsp vanilla and set aside.

            Add the 3 eggs, 3 egg yolk, and 1 cup sugar to the bowl of an electric mixer and whisk until the contents have almost tripled in volume. The egg mixture should be thick enough that when drizzled over itself, it will stay on the surface for a few seconds.

            Before whisking:

            After whisking:

            Once the egg mixture has tripled, switch from the whisk attachment to the paddle attachment and mix in the dry mixture and milk mixture. 


            After all of the ingredients are well mixed, line a cupcake tray with paper liners and fill each liner 3/4 full. Then bake for 18 minutes or until a toothpick comes out clean.


              Coffee Syrup:

              While the cupcakes are baking, make the coffee syrup by whisking together the 1/4 cup coffee, 1/4 cup Kahlua, and 1/4 cup sugar in a small bowl, then set aside. 


              Mascarpone Frosting:

              To make the frosting, start by whisking 1 cup of heavy cream in an electric mixer until it forms stiff peaks.

              Then mix in 8 oz. of mascarpone and 1/4 cup powdered sugar. It should look something like the picture below!


              Cupcake Assembly:

              Once you have all of your components you can either assemble everything right away or else wait and store the components separately until you are ready to eat them! Remember, only prepare them the day that you plan to eat them!

              Ok, once you are ready to assemble the cupcakes poke holes in the tops of the cupcakes either with a toothpick or a small knife. Then, use a pastry brush to brush the coffee syrup onto the top of the cupcakes (about 5-7 coats per cupcake). Make sure to use all of the syrup! It might seem like a lot, but won't be too much!


              After brushing on all of the syrup, put the mascarpone frosting in a piping bag and pipe it onto the cupcake covering all of the holes in the top of the cupcake.


              Then dust the top of the cupcakes with cocoa powder!


              Vuala! Eat up!


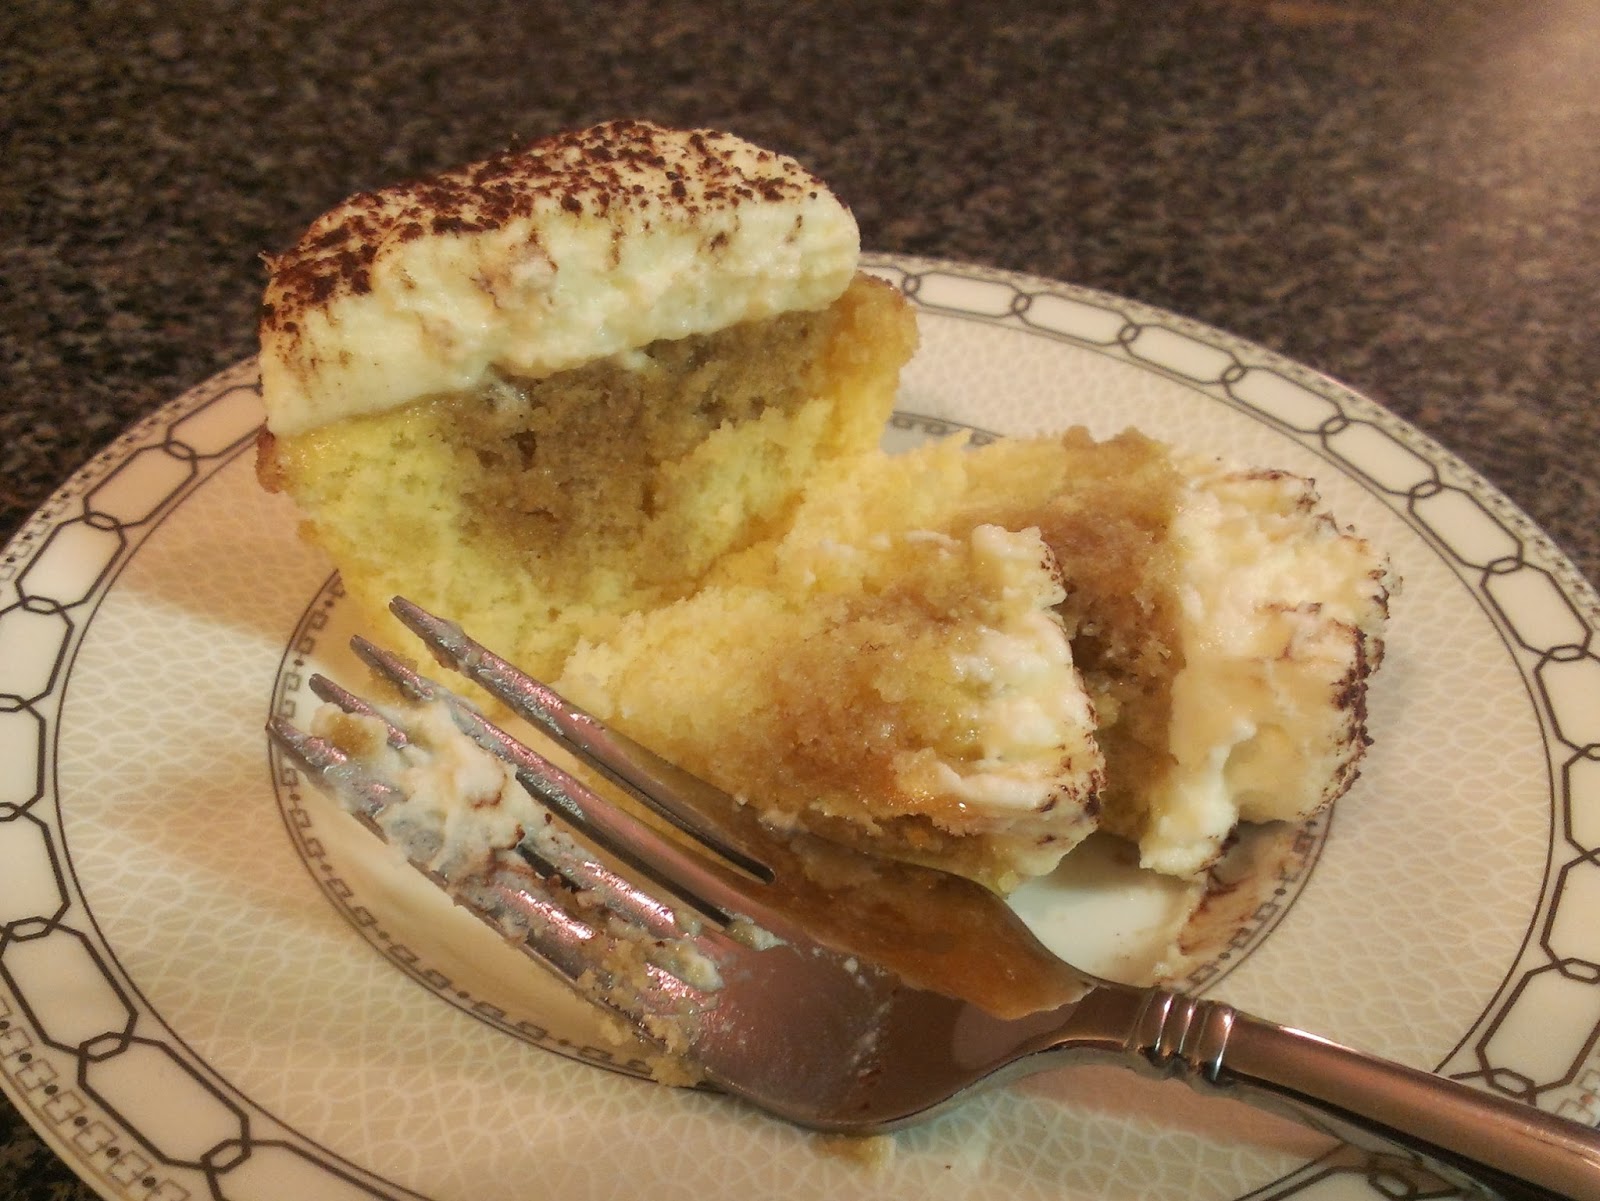
              Here you can see how the coffee syrup got down into the cupcake giving it the delicious Kahlua coffee flavor!


              Yum!


              Tiramisu Cupcakes
              Ingredients:

              Vanilla Cupcakes:
              • 1 & 1/4 cups CAKE FLOUR
              • 3/4 tsp BAKING POWDER
              • 1/2 tsp SALT
              • 1/4 cup MILK
              • 2 tsp VANILLA 
              • 2 Tbs BUTTER, unsalted
              • EGGS & 3 EGG YOLKS
              • 1 cups SUGAR
              Coffee Syrup:
              • 1/4 cup STRONG COFFEE
              • 1/4 cup KAHLUA
              • 1/4 cup SUGAR
              Mascarpone Frosting:
              • 1 cups HEAVY CREAM
              • 8 oz. MASCARPONE CHEESE
              • 1/4 cup POWDERED SUGAR
              • COCOA POWDER, for dusting 

                  Directions:

                  Vanilla Cupcake:
                  1. Preheat your oven to 325 degrees F
                  2. In a medium bowl sift together the 1 & 1/4 cups cake flour, 3/4 tsp baking powder, and 1/2 tsp salt, then set aside. 
                  3. Put the 2 Tbs of butter in a small microwave safe bowl and microwave in 30 second intervals until the butter has melted. Then mix in the 1/4 cup milk and 2 tsp vanilla and set aside.
                  4. Add the 3 eggs, 3 egg yolk, and 1 cup sugar to the bowl of an electric mixer and whisk until the contents have almost tripled in volume. The egg mixture should be thick enough that when drizzled over itself, it will stay on the surface for a few seconds.
                  5. Once the egg mixture has tripled, switch from the whisk attachment to the paddle attachment and mix in the dry mixture and milk mixture. 
                  6. After all of the ingredients are well mixed, line a cupcake tray with paper liners and fill each liner 3/4 full. Then bake for 18 minutes or until a toothpick comes out clean.
                  Coffee Syrup:
                  1. While the cupcakes are baking, make the coffee syrup by whisking together the 1/4 cup coffee, 1/4 cup Kahlua, and 1/4 cup sugar in a small bowl, then set aside. 
                  Mascarpone Frosting:
                  1. To make the frosting, start by whisking 1 cup of heavy cream in an electric mixer until it forms stiff peaks.
                  2. Mix in 8 oz. of mascarpone and 1/4 cup powdered sugar. It should look something like the picture below!
                  Cupcake Assembly:
                  1. Once you have all of your components you can either assemble everything right away or else wait and store the components separately until you are ready to eat them! Remember, only prepare them the day that you plan to eat them!
                  2. Once you are ready to assemble the cupcakes poke holes in the tops of the cupcakes either with a toothpick or a small knife. Then, use a pastry brush to brush the coffee syrup onto the top of the cupcakes (about 5-7 coats per cupcake). Make sure to use all of the syrup! It might seem like a lot, but won't be too much!
                  3. Put the mascarpone frosting in a piping bag and pipe it onto the cupcake covering all of the holes in the top of the cupcake.
                  4. Dust the top of the cupcakes with cocoa powder.


                  I found this recipe on this blog: http://alimentageuse.com/2012/11/16/tiramisu-cupcakes/